Un-bricking my ThinkPad Yoga 11e Chromebook
Date: February 11, 2023Description: This is the story of how I un-bricked my Lenovo ThinkPad Yoga 11e Chromebook.
Backstory
After having some success installing Linux on a battery-less CR48 Chromebook I decided it was time to get something slightly faster, with a battery. Eventually I found a ThinkPad Yoga 11e on Amazon for $60! So I ordered it and waited patiently for it to arrive. The day it showed up I got to work flashing the firmware so I could install Linux on it.
I found an awesome tutorial online and followed along closely. After entering developer mode, tearing the whole laptop apart, and removing the write-protect screw, I was ready to flash the firmware. I reassembled the whole machine, booted it up, launched a crosh and then bash shell, and ran the MrChromebox.tech firmware-util script.
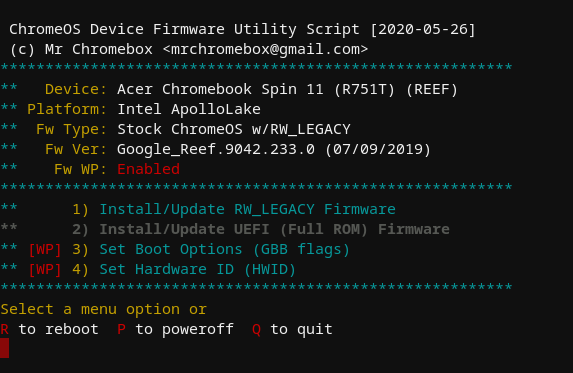
I hesitated at first, not being entirely sure which option to select. After a quick Google search and a glance at the first result, I decided to select option 1: Install/Update RW_LEGACY Firmware.
Oops
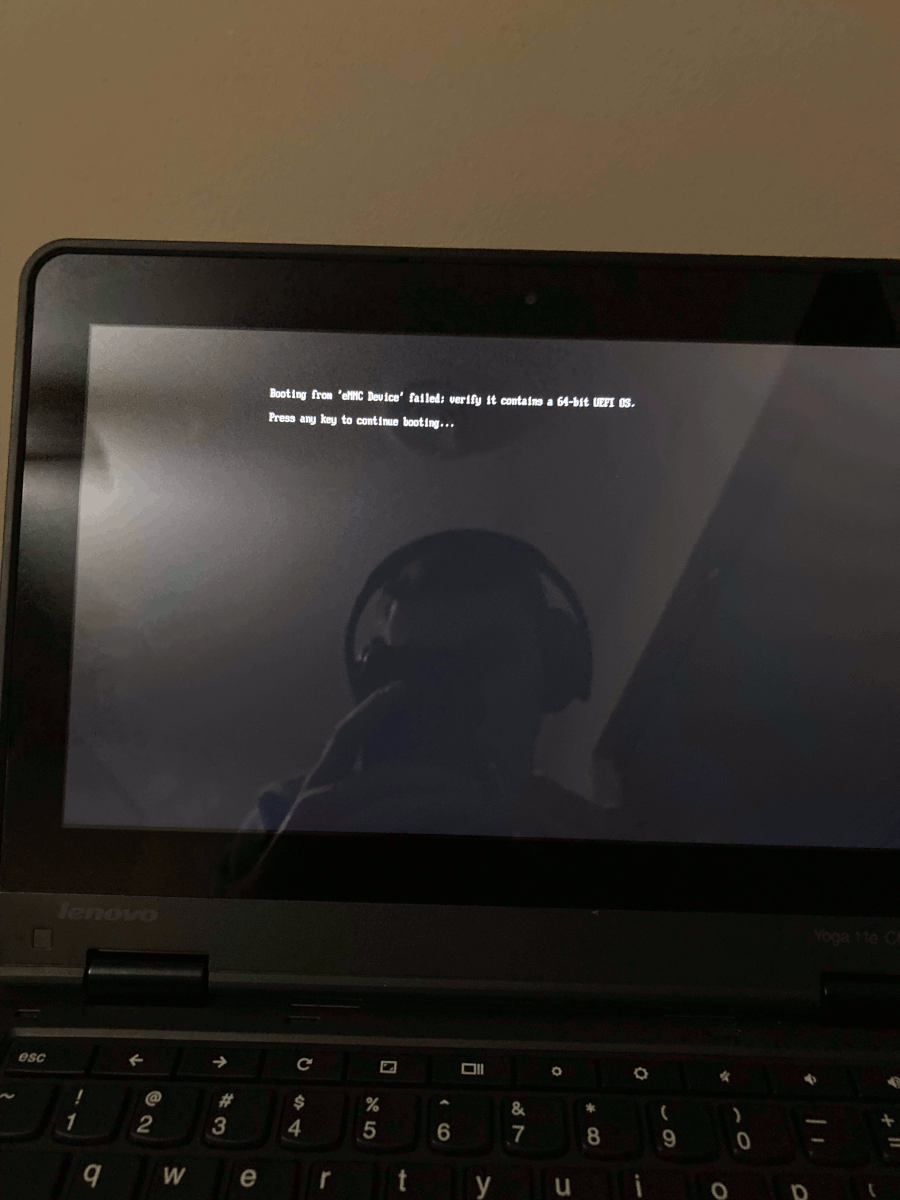
The install went great, it had a nice progress read out and a success message at the end! I felt completely confident that I had nailed it. But of course, I did not. I installed the legacy BIOS option, but my laptop uses UEFI not BIOS (learn more). This effectively bricked my machine. Immediately after rebooting I was met with a horrifying black screen. I didn’t even have the faint glow of the LCD back light to comfort me. I tried, in vain, for about an hour to boot off a USB, get into the BIOS, or even just get the LED in the ThinkPad logo to light up on the back. With my efforts bearing no results, I eventually gave up. Distraught and grieving over the $60 I had wasted in less than 2 hours, I walked away.
About a week later, still with the bitter taste of defeat, I decided to see if I could fix it. After all, the hardware was fine, I had just written an incompatible firmware to some flash storage chip on the motherboard somewhere. So I set out searching for anyone who had gotten themselves into a similar situation. One day I came across Flashing the BIOS to Fix a “Bricked” Lenovo Laptop by Dave Madison offering a solution to my exact problem. Suddenly there was a light at the end of the tunnel. A potential solution that had an excellent chance of working. And I was ready to redeem myself from this rookie mistake!
Redemption
The first challenge I needed to overcome was finding and downloading the correct firmware. After no results searching directly for the firmware, I decided to go back to where it all started, the firmware-util script. After a quick look at the code on GitHub I noticed that there was a huge list of firmware sources. A quick search for the code name glimmer, and I found the firmware that I was supposed to have installed.
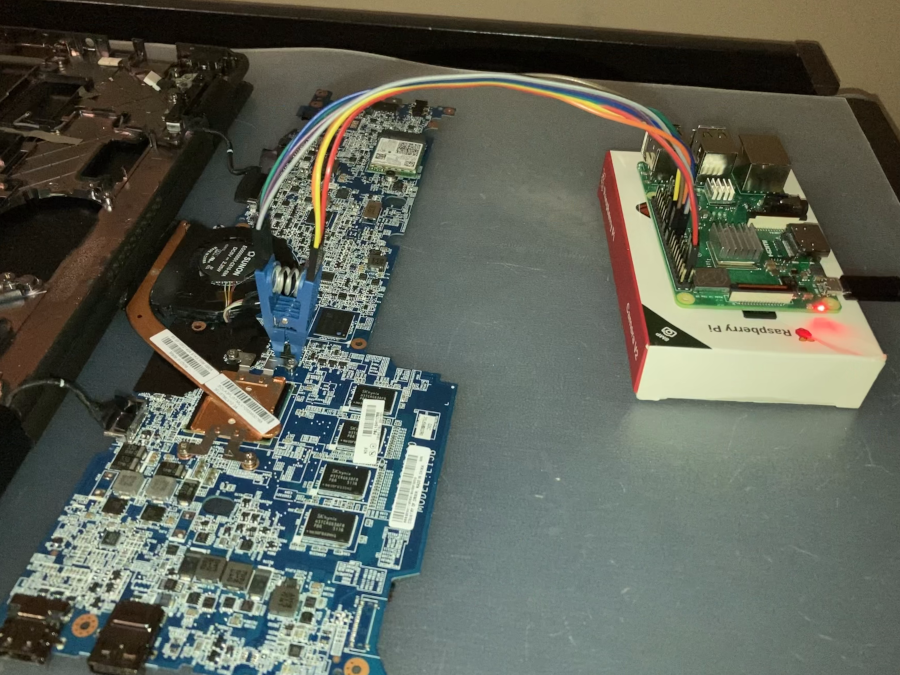
So with the correct firmware in hand, all that was left to do was flash it to the laptop. In the Parts Not Included article they used a $22 Arduino Nano with a $7 Serial Converter to connect to a $7 SOIC8 Clip which would then connect to the flash chip on the motherboard. Then they compiled flashrom for their Arudino, and used that to flash the correct firmware onto the chip. Paying $36 to rescue a $60 laptop wasn’t ideal, so I bought the $7 SOIC8 clip and about $7 worth of jumper cables figuring I’d make due with a Raspberry Pi I had laying around.
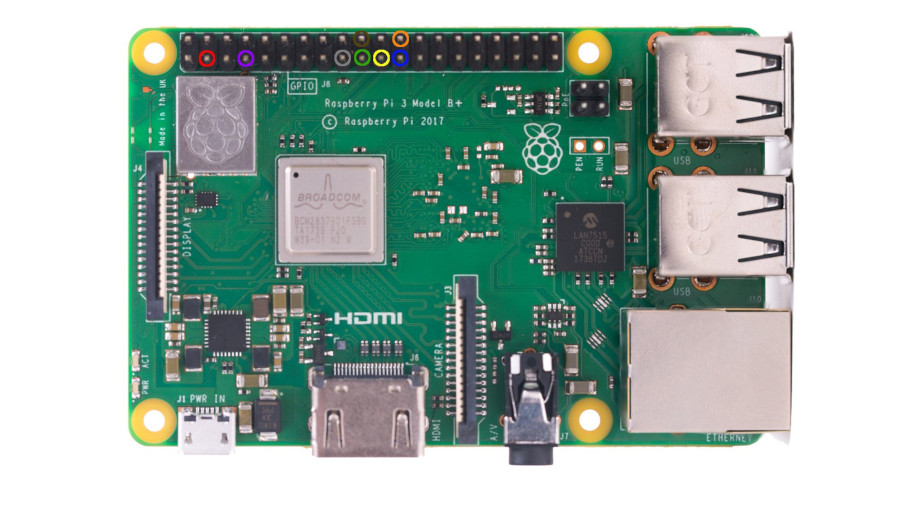
Turns out, running flashrom on a Raspberry Pi is a common use case. So common, in fact, that there is a whole wiki page for it. The pin-out on that page, along with the corresponding pin-out for my Raspberry Pi, was enough for me to come up with the following wiring to get the SOIC clip hooked up.
Wiring Key
| Pin | ABBR | Purpose | Color |
|---|---|---|---|
| 1 | CS | Chip Select | Orange |
| 2 | SO | Serial Out | Yellow |
| 3 | WP# | Write Protection | Red |
| 4 | GND | Ground | Brown |
| 5 | SI | Serial In | Green |
| 6 | CLK | Clock | Blue |
| 7 | HOLD | Hold | Purple |
| 8 | VCC | 3.3V Power | Grey |
Raspberry Pi
I used a Pi 3B, but it seems most models have similar pin-outs.
| GPIO | A | B | C | D | E | F | G | H | I | J | K | L | M | N | O | P | Q | R | S | T |
|---|---|---|---|---|---|---|---|---|---|---|---|---|---|---|---|---|---|---|---|---|
| Outer | . | . | . | . | . | . | . | . | . | 4 | . | 1 | . | . | . | . | . | . | . | . |
| Inner | . | 3 | . | 7 | . | . | . | . | 8 | 5 | 2 | 6 | . | . | . | . | . | . | . | . |

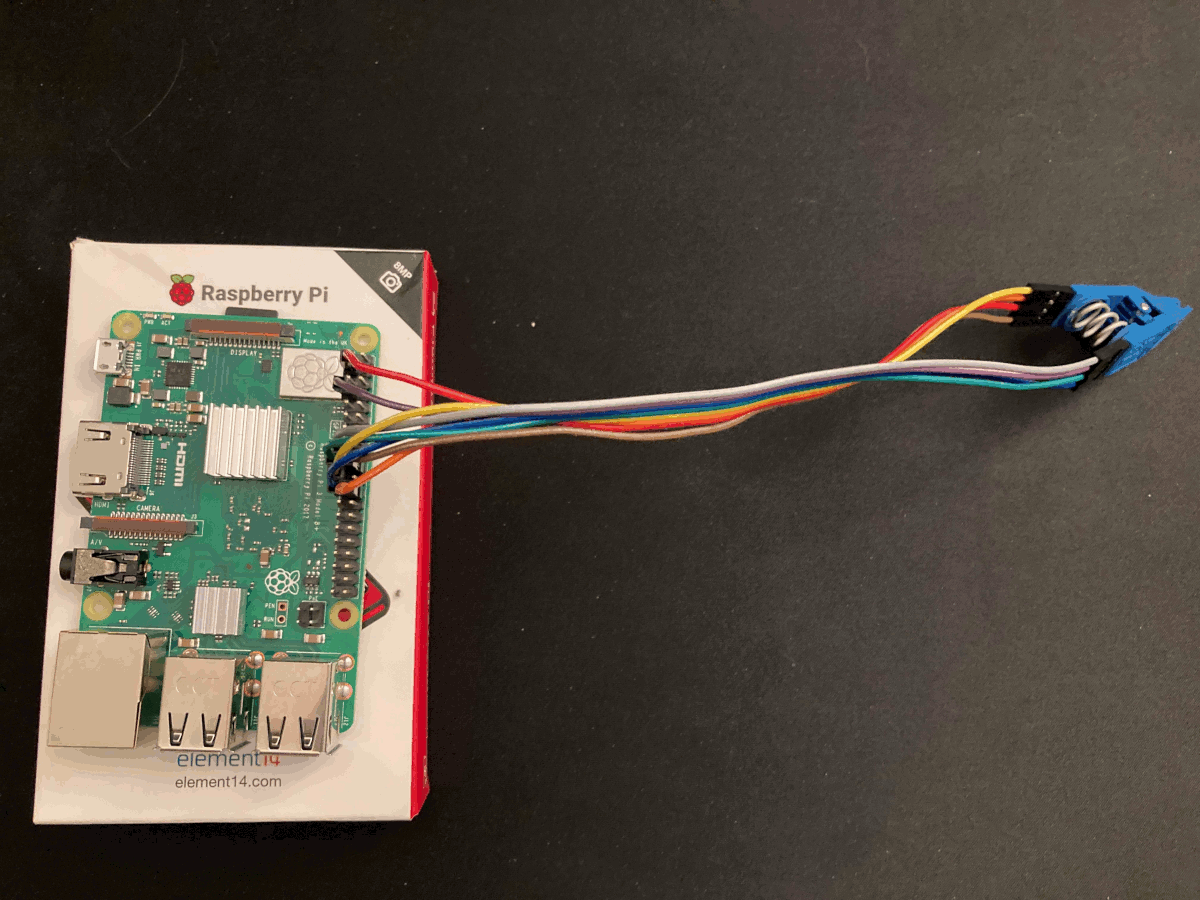
SOIC Clip
Any side can be top or bottom. You just need to know which side goes where when you clip it to the flash chip.
| SOIC Pins | A | B | C | D |
|---|---|---|---|---|
| Top | 8 | 7 | 6 | 5 |
| Bottom | 1 | 2 | 3 | 4 |
End Result
After I got all of that hooked up I had something that looked like an alien weapon, and I loved everything about it!
Resurrection
With the proper firmware downloaded, and the SOIC clip wired up, the next thing to do was take the laptop apart again. Lenovo has a pretty in-depth hardware manual, without which I would have had a much harder time figuring out what I was looking for. After taking the entire lower half of the laptop apart I was able to remove the motherboard. I tore off a black plastic sheet, that I hoped wasn’t too important, and located the flash chip where the BIOS is stored.
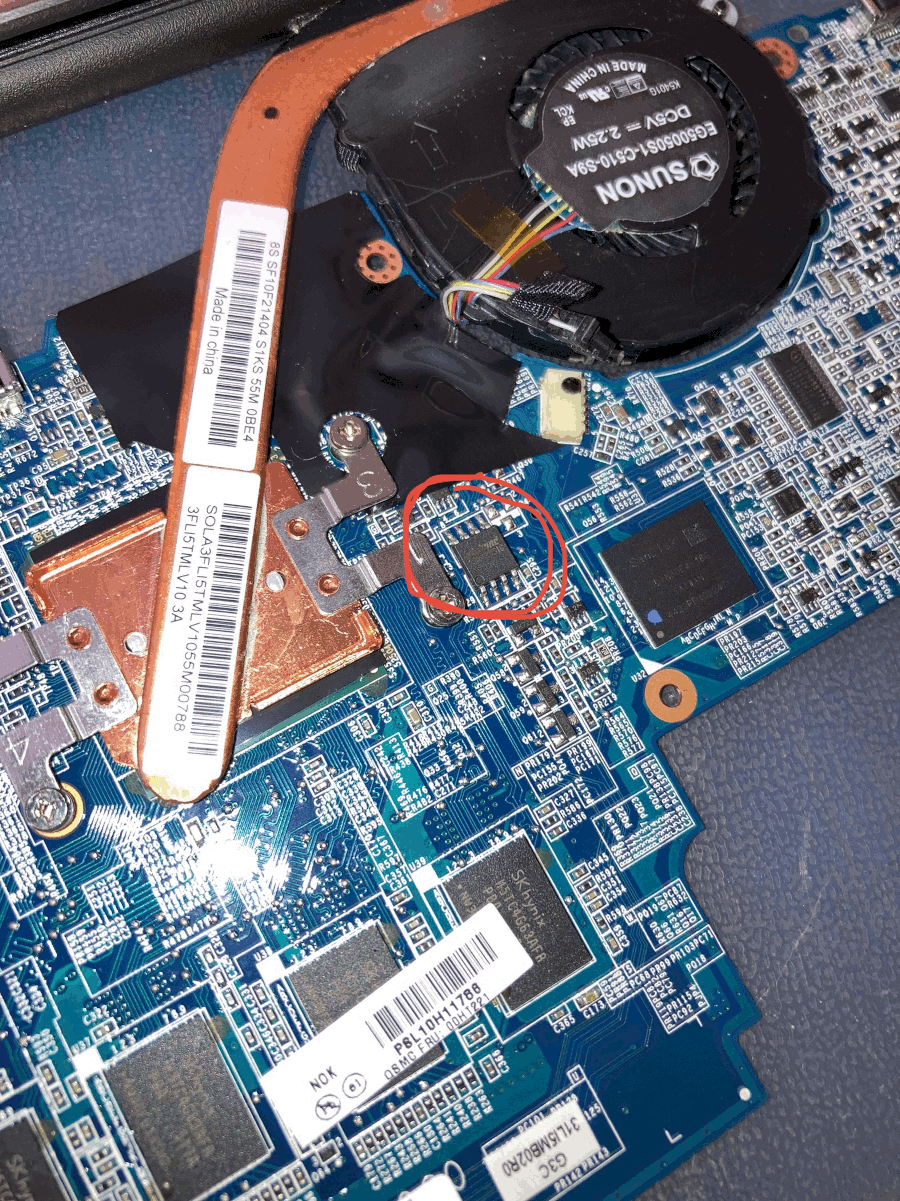
After a few attempts I was able to clip the SOIC flasher onto the chip – which is surprisingly difficult to do correctly – so then I just needed to flash the new firmware!
I ended up writing a series of scripts to handle the flashing using flashrom.
Test the serial connection:
#!/bin/bash

# Reference: https://www.flashrom.org/RaspberryPi

/usr/sbin/flashrom \
	-p linux_spi:dev=/dev/spidev0.0,spispeed=1000
Backup the current firmware:
#!/bin/bash

# Reference: https://www.flashrom.org/RaspberryPi

CHIP="W25Q64.W"

/usr/sbin/flashrom \
	-p linux_spi:dev=/dev/spidev0.0,spispeed=1000 \
	-c $CHIP \
	-r ./roms/backup.rom
Write the new firmware:
#!/bin/bash

# Reference: https://www.flashrom.org/RaspberryPi

CHIP="W25Q64.W"
ROM="./roms/coreboot_tiano-glimmer-mrchromebox_20210725.rom"

/usr/sbin/flashrom \
	-p linux_spi:dev=/dev/spidev0.0,spispeed=1000 \
	-c $CHIP \
	-w $ROM
Verify that the firmware on the chip matches your local copy:
#!/bin/bash

# Reference: https://www.flashrom.org/RaspberryPi

CHIP="W25Q64.W"

/usr/sbin/flashrom \
	-p linux_spi:dev=/dev/spidev0.0,spispeed=1000 \
	-c $CHIP \
	-r ./roms/verify.rom
After a painstakingly slow flashing process, it was all done. I quickly put the laptop back together and booted it up. Eureka!
Conclusion
After un-bricking the laptop, I was able to install several Linux distributions on it and it is still going strong to this day. I have been impressed by how good the battery life is, because it is using such a low powered chip. Bricking and then un-bricking this laptop was a great learning experience that I’m glad I had. This was by far the most complicated and in-depth hardware hack I have accomplished to date, and I hope it stays that way for the foreseeable future.
If you or a loved one are suffering from a bricked laptop, I hope this post has been helpful and I wish you the best of luck on your road to recovery.
Shopping
References
- Glimmer flashrom scripts
- Install arch on a Lenovo Yoga 11e Chromebook
- Flashing BIOS to Fix a “Bricked” Lenovo Laptop
- MrChromebox.tech fwscript details
- MrChromebox GitHub search for glimmer
- Glimmer firmware source code
- Raspberry Pi Flashrom
- Raspberry Pi Pin-out
- ThinkPad Yoga 11e Chromebook Hardware Maintenance Manual